Showing posts with label fall. Show all posts

Friday, October 9, 2015

Welcome Fall with a Little Bling

Hey everyone!  Happy Friday.  Hope you are having a great day.  I have been mad decorating for the fall, not so many spooky things now that my son is gone, really enjoying a bit more of a relaxed holiday.  lol

Anyway, today I wanted to share with you a quick and easy project I created with a pumpkin I found at Michaels, some scraps from a Rhinestone Sticker sheet from the Buckle Boutique (which is on sale now) and my Cricut.

So, I found this cute little pumpkin on sale at Michaels.  It already had some pretties on it, but you can never have too many beautiful things so...
I cut a few flourishes from the Cheetah print rhiniestone sheet (I just love the fall colors in it...and a little animal print is always good for the soul.  hee hee) with my Sizzix.  Be sure and use your cutting pad, die, rhinestone sheet and second cutting pad in that order for best results.
The Buckle Boutique Rhinestones cut so easily with the steel rule dies from Sizzix.  It is definitely one of my favorite ways to use the Rhinestone Sticker Sheets.  The die I used is super old, but there are plenty of gorgeous Sizzix flourish dies to choose from.
Then I simply placed my flourishes on the top of my pumpkin.  So easy, right?
I finished the pumpkin decorating off with a big sunflower I had lying on my desk and a "welcome" I cut from my Cricut from vinyl.
This project was super simple and took no time at all to complete.

Thanks for stopping by.
Hugs.

Wednesday, October 7, 2015

Leafy Witch Hat With Sizzix and Core'dinations

Looking for a not so scary decoration7s for your Halloween festivities?  How about this lovely fall witch’s hat that I created last year for Core'dinations?  This project is quick and easy and you only need a few items.  
witch_hat_coredinations_nancy-keslin_final_edited-1
Leafy Witch Hat Supplies:
witch_hat_coredinations_nancy keslin_supplies
Step 1.  Die cut, emboss, and sand leaves.  I made a total of 12 leaves, 4 of each color: No. 6, No. 7, and No. 20; yellow, orange and brown.  After sanding wipe each down with your Sand-it Gadget.
witch_hat_coredinations_nancy keslin_cut_emboss_sand
Step 2. This step is not necessary, but for added interest and depth, you can ink the edges of the leaves.
witch_hat_coredinations_nancy keslin_ink
Step 3.  To create spiral flower, begin by drawing a spiral on the back of the copper Glitter Silk sheet.
witch_hat_coredinations_nancy keslin_spiral
Step 4.  Cut along drawn line.
witch_hat_coredinations_nancy keslin_cut_rosette
 Step 5.  Roll flower from outside edge and adhere to center when complete.  I like to step on the flower a bit to add more dimension.
witch_hat_coredinations_nancy keslin_roll_stomp
Step 6.  Adhere burlap flower and metallic ribbon to hat.
witch_hat_coredinations_nancy keslin_ribbon_flower
Step 7.  Attach leaves behind burlap flower.
witch_hat_coredinations_nancy keslin_leaves
Step 8.  Finish by adding rolled flower to center of burlap flower.
witch_hat_coredinations_nancy keslin_rosette witches_hat_coredinations_nancy-keslin_square

Friday, November 21, 2014

Lanterns and Leaves

Hi everyone!  Nancy here today and I have quite a bit to share with you.

A few weeks ago I shared this photo on my Instagram.

And I had people on Facebook and Twitter asking for a tutorial, so I made a video which you can see here...


ClearScraps acrylic sheets are so very fun to work with, especially when you die cut, emboss, and ink them up with a bit of Stazon.  hee hee

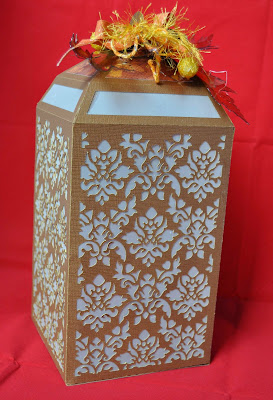
Then, the question arose, what do I do with these leaves I made. Well, I told you recently how much fun I have been having with the files from svgcuts....so I decided to make this lantern.  Seriously, this took me so long to cut.  But it was all worth it in the end.

Of course I used Core'dinations Basics Neutrals cardstock and Core'dinations vellum.  They both cut so beautifully on my new Cricut Explore (once I got the stupid program to run properly....ugh, shockwave).

I added my fall leaves, lots of trims and a bit of ribbon...and of course a few flowers from the stash.

And then I gave it to a friend.  hee hee.  You can add a little battery operated tealight inside to make it glow, which was hard to photograph, just saying.  I wouldn't advise using a candle, as....well, this is made of paper after all and lighting your home on fire would not be a good way to start the holidays.

Hugs.


Tuesday, November 18, 2014

So Very Happy - Multiphoto Layout

Hey everyone!  Hope you are having a great day.  Just wanted to let you know that I have a post up over on the Layout-a-Week blog today with a step by step tutorial and all the pertinent deets.

Do you see Ainsley's pink hair....that girl has an artist in her.  lol  Mackenzie has really grown so much, and is such a blessing.  Brighton even came home from college that day to go to the pumpkin patch so I could take his photos.  That boy sure knows how to make his mama happy!  These three really do make me So Very Happy.

Well, back to work.
Hugs

Friday, November 14, 2014

SVGCuts Scarecrow

Hey everyone!  Hope you are having a great day and getting ready for the weekend.  Lots to do around here getting ready for the holidays, CHA, and just life in general.  More swim, more school....

My new love tho? I have been having the best time building paper projects (mostly home decor) from svgcuts.com with my Cricut and Coredination's Cardstock.  I love the texture and dimension I can get with the cardstock and a few embossing folders.   Yes, this entire project is done using cardstock and just a few buttons.

I chose quite a few of the Darice embossing folders that I have had in my stash, and lots of different fall colors of cardstock.  Stripes, honeycomb, chevrons; Darice has quite a variety of folders available for embossing.
I was really pleasantly surprised with how easy my little scarecrow was to put together.  I think it took longer to make all the cuts and feed through all the colors than it did to glue everything up.

I think he needs a name, but he has found a new home amongst my other Thanksgiving decor.

Hugs,

Wednesday, November 12, 2014

Rustic Fall Banner - Coredinations

Hi everyone!  Hope you are having a great week!  Things here are fabulous...ok, maybe not fabulous, but good.  The holidays are rapidly approaching and we are crazy busy with all that that entails.  Lots of school projects, holiday projects and of course crafting and creating,  Anyway,,,,today I wanted to share with you this Rustic Fall Banner I made for Core'dinations!  This is a simple project that takes just a bit of time to create, and can be expanded to fit just about any theme.  Fall-banner
Rustic Fall Banner Supplies:
fall_banner_coredinations_nancy keslin_supplies Step 1.  Cut Kraft cardstock to 4×6 and emboss with the wood grain embossing folder.  I used Tim Holtz Wood Grain Texture Fade.fall banner_cut_emboss_nancy keslin_coredinations_edited-1 Step 2.  Create pennant shape by marking the center of the rectangle one inch from the bottom, draw lines to to the corners, and cut.  This is how I create all the banners that I use and can easily be adapted to any size bunting.  This shape is quite popular in scrapbooking and I use it all the time.  A centering ruler really comes in handy here.fall_banner_pennant_nancy keslin_coredinations_edited-2 Step 3.  Cut letters for word or sentiment from black cardstock in your favorite font and center on pennants.  I used my Cricut to cut these, but any die cut machine, manual or electric would work.  Or you could use precut alphabets.fall_banner_letters_nancy keslin_coredinations_edited-1 Step 4.  Score top of pennant at 1/2 inch.  This will create a pocket for your cord.  You don't really need the pocket, but I find it gives the finished project a much more finished look.  You could poke holes in the pennant and string through that if you like.fall_banner_score_nancy keslin_coredinations_edited-1 Step 5.  Run cord through all the pennants and seal with glue, or for extra interest sew closed.  I chose to sew my pocket closed as it added a bit of interest. fall_banner_coredinations_nancy keslin_string
Step 6.  Tie cinnamon sticks in a small bundle and thread onto cording, one at each end.  They give the banner of lovely fragrance.fall_banner_coredinations_nancy keslin_cinnamon sticks
Step 7. Finish by clipping bird next to the cinnamon sticks.  This just gave the ends some weight so that I could swag the banner across my mantle, but the birds and cinnamon sticks are really just for embellishment.
fall_banner_coredinations_nancy keslin_birdThat's it....all done!  And so easy.  

Thanks for stopping by.

Hugs.

Nancy

Wednesday, October 29, 2014

Core'dinations and Turkeys?

Hi everyone!  Today I am up over on the Coredinations blog with a cute project for your littles (I had my niece and one of her friends for a playdate one afternoon) this fall.  Hop on over and check it out....


I will be back later with the tutorial for the "girl" hat.

Hugs.

Monday, January 20, 2014

Patch - The Sampler

Hi everyone!  Hope you had a great weekend.  Today I am sharing what I promise is the last project from my November Sampler kit.


I added a few buttons from my stash, but I love, love, love those huge acrylic letters from the Pier 1 collection!  Aren't they just fabulous?  And I of course had to add a bit of mist and mediums in my background.   I just can't seem to get away from creating my own background pages.   lol

Anyway, hope you are having a great day.

Hugs.

Nancy

Thursday, January 9, 2014

Family Traditions - Pumpkin Patch

Hi everyone!  So, I am trying to catch up on blog posts and sharing my work...and I realize how many thing I just never shared.  Oh well.

I made this layout with a few photos of Mackenzie and the Family Traditions collection from Webster's Pages...love that line, just haven't had much of an opportunity to play.


I really haven't been making as busy of layouts lately...not sure how much I love this one.  I promise though, it does look better IRL.

Hugs.

Nancy

Monday, November 26, 2012

And We're Back...

Hi everyone!  I hope you had a great weekend.  Mine, as usual, was crazy busy...this time, not with swim, but with decorating for the holidays.  It seems I may go a bit overboard around here with setting up 5 trees...but I so love them...and each has a theme and all.  And, believe it or not...even with 5 trees I still had ornaments that didn't make it onto the tree because there just wasn't room.  I promise to come back and show you pictures of them all.

Well, the flu is still somewhat lingering around here...what's a girl to do.  Overall though we are feeling much better and hope to catch up on goings on soon.

For today I wanted to share with you this layout I did of my three lovelies using some older Basic Grey paper and a sketch from My Creative Sketches.
 
Lots of grungy Distress Inks, Gorgeous Petaloo flowers and ZVA bling. 

Well, it is Monday so I guess I should get back to work.

Hugs.

Nancy

Tuesday, October 30, 2012

Fall Fun - The Sampler


Hi everyone!  Today I want to share with you another layout I made with the Warm kit from the Sampler kit club.  I have really loved the kit this month.  And it was perfect for this photo I took of the children at a little farm down the street this last weekend.  Trying to get some "Senior" photos of Brighton...sigh...they grow so fast.  And you know I couldn't resist snapping a few of the girls as well.
 (sorry about the funky lighting in the photo...don't know what is going on these days.  I bought I light box, but haven't had much success with it.  I need to keep trying tho as with the winter rains coming.....)
Well, lots of gorgeous motifs to fussy cut in this kit and the colors are just gorgeous.  I  love the mix of patterns this month and I know you will as well.  With the help of the October 26th Sketch from Stuck on You Sketches, I was able to complete this layout in no time at all!

There is still lots of time to play along with us at the monthly sketch and card challenges.  You don't need to purchase a kit to play and you have a chance of winning some great prizes!  Be sure and check it out.

Hugs.

Nancy

Tuesday, October 2, 2012

Taste of Fall - The Sampler


Good morning bloggers! Today I want to share with you another project using the September kit from The Sampler kit club.  This kit is so full of yummy goodies the projects keep coming.  This time some photos of dh and I at a wine tasting at one of our local wineries.  (I know the photo looks crooked....I was having camera issues).
 
I love all the textures in this kit. The super cute felts, the lovely laces, and of course the washi tape.  I couldn't resist using lots of stitching and a sketch from Page Maps.

The October Kit is just as gorgeous (probably my favorite yet) and is available in the store right now.  Grab yours before it's gone.  And don't forget about the sketch and card challenges going on now at The Sampler.  Lots of goodies to be won...no purchase necessary.


Hugs.

Nancy