Wednesday, November 26, 2014

Pinecone Turkeys- Kids Craft Tutorial.

Hi everyone!  Happy almost Thanksgiving!  I wanted to share with you today a fun project you can do with your littles for Thanksgiving.  I originally made this for Core'dinations, and you can see it here.


Pine Cone Turkey Supplies:
pinecone_turkey_coredinations_nancy keslin_supplies
Step 1: Paint foam ball with brown acrylic paint.  Helpful hint: insert a skewer or small stick into the ball to keep fingers out of the way.  You can even keep the ball on its stick while it dries.  
pinecone_turkey_coredinaitons_nancy keslin_paint_no face
Step 2: While paint dries, trace and cut out two hand prints on Core'dinations Vintage Collection papers.  I let my little friends cut their own hand prints out...good practice with the scissors, but keep some tape handy...jic.  lol
pinecone_turkey_coredinations_nancy keslin_trace hand
Step 3: Glue handprints to the stem end and foam ball to the top of the pinecone to create  the basic turkey shape.
pinecone_turkey_coredinations_nancy keslin_handprint
Step 4:  Assemble the face of the turkey by inserting a 1/2 inch piece of yellow chenille stem in center of ball and wrapping a 1- 1/2 to 2 inch piece of red chenille stem around it.  Attach google eyes with glue.  Look how easy making a turkey face is.  Who knew.
pinecone_turkey_coredinations_nancy keslin_face
Step 5:  To create the male hat cut a 3 inch circle from black Core Basics cardstock.  Draw a 2 inch circle about 3/4 of the way around and cut out.
pinecone_turkey_coredinations_nancy keslin_ringStep 6:  Cut edges out of the semicircle and fold up to create hat shape.
pinecone_turkey_coredinations_nancy keslin_foldStep 7:  To embellish hat cut a small piece of white Core Basics cardstock approximately 1 1/2 inches by 1/2 inch and add a little glitter to the center to create the hat band and buckle.
pinecone_turkey_coredination_nancy keslin_buckle
Step 8:  Place hat on turkey head, glue if desired.

Now, you know my little friends wanted kerchiefs for their turkeys as well, so that they could have girl turkeys.  lol

To Create the kerchief
Step 1: Cut a strip of white cardstock 2x4 inches, cut along solid lines to create the kerchief shape.
Step 2:  Fold edge of cardstock up 1/4 inch to create kerchief.
Step 3:  Poke small holes in ends of kerchief to create laces that you can then tie.  I used just a small piece of baker's twine knotted on either end.

Step 4:  Place kerchief on turkey head and tie in a bow.  I tied it loosely so my little friends could easily slip it off and on.

Don't they make the cutest little couple?


I am sure your little ones will enjoy their turkey friend for many years to come.


Monday, November 24, 2014

Mini Album Addiction

Happy Monday everyone!  Hope you are having a great week.  Things are even more crazy here than usual as we prepare for Thanksgiving.  Brighton's coming home for a few days (you would think that since he is 45 minutes away we would see more of him), houseguests, and of course cooking a huge feast.  lol  Oh....and you know the crafting never ceases.

And on the subject of crafting...here is a cute little chunky mini board book I made back when Eileen Hull was on her papertrail.  I shared with you a few of the other projects we made...but not this one.  I don't know why, just hadn't gotten around to it I guess.  Well.....here it is.

I really love making minis...and this one was so cute.  Made with Eileen Hull's Box die and a few of her embossing folders and filled with all kinds of junk I had lying on my desk.  I learned much about mat board and embossing and my sizzix machine...well..and that I have way too many mini books with nothing in them.  lol


Have a great day.

Friday, November 21, 2014

Lanterns and Leaves

Hi everyone!  Nancy here today and I have quite a bit to share with you.

A few weeks ago I shared this photo on my Instagram.

And I had people on Facebook and Twitter asking for a tutorial, so I made a video which you can see here...


ClearScraps acrylic sheets are so very fun to work with, especially when you die cut, emboss, and ink them up with a bit of Stazon.  hee hee

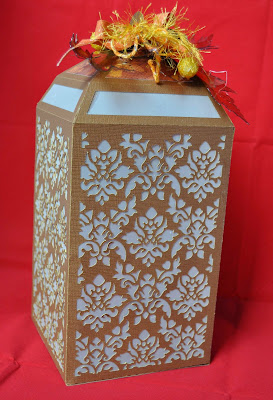
Then, the question arose, what do I do with these leaves I made. Well, I told you recently how much fun I have been having with the files from svgcuts....so I decided to make this lantern.  Seriously, this took me so long to cut.  But it was all worth it in the end.

Of course I used Core'dinations Basics Neutrals cardstock and Core'dinations vellum.  They both cut so beautifully on my new Cricut Explore (once I got the stupid program to run properly....ugh, shockwave).

I added my fall leaves, lots of trims and a bit of ribbon...and of course a few flowers from the stash.

And then I gave it to a friend.  hee hee.  You can add a little battery operated tealight inside to make it glow, which was hard to photograph, just saying.  I wouldn't advise using a candle, as....well, this is made of paper after all and lighting your home on fire would not be a good way to start the holidays.

Hugs.


Wednesday, November 19, 2014

What a Doll Tags - Prima

hi everyone!  Well, you may remember that I told you how fortunate I was to be able to travel to southern california a few weeks ago to attend the retailer mixed media event.  One of the fabulous teachers that day was Julie Nutting....oh so star struck.  lol  And she even knew who I was....swoon!!!!

Anyway, we got to play with some of her stamps and more of the new art materials that Prima just came out with.  Here is my take....


Aren't they just lovely?  We were able to play with the new crackle mediums, the resist canvas, and glitters as well as the new pinwheel stencils.  Love the gold crackle...you know I had to own it.  hee hee

Anyway, so much fun that day.  And I still have more tags to show you from Jamie's class.

Hugs

Tuesday, November 18, 2014

So Very Happy - Multiphoto Layout

Hey everyone!  Hope you are having a great day.  Just wanted to let you know that I have a post up over on the Layout-a-Week blog today with a step by step tutorial and all the pertinent deets.

Do you see Ainsley's pink hair....that girl has an artist in her.  lol  Mackenzie has really grown so much, and is such a blessing.  Brighton even came home from college that day to go to the pumpkin patch so I could take his photos.  That boy sure knows how to make his mama happy!  These three really do make me So Very Happy.

Well, back to work.
Hugs

Monday, November 17, 2014

Going Anywhere? Clear Scraps and KaiserCraft

Hey everyone!  Wanted to stop by and let you know that I have a chipboard mini album up over on the Clear Scraps blog today.  We are working all this week with beautiful goodies from KaiserCraft.  I was so fortunate to receive some papers and embellishments from the Telegraph Road line.  Yum!!!!

Of course I also mixed in a few bits and pieces from my stash.  Flowers, butterflies, lace and pearls, even a few resin pieces.  This project was really so fun to make....and I of course used lots of Stazon inks to highlight everything.

You can find the whole project (inside pages) over on the Clear Scraps Blog.

Thanks for stopping by.


Friday, November 14, 2014

SVGCuts Scarecrow

Hey everyone!  Hope you are having a great day and getting ready for the weekend.  Lots to do around here getting ready for the holidays, CHA, and just life in general.  More swim, more school....

My new love tho? I have been having the best time building paper projects (mostly home decor) from svgcuts.com with my Cricut and Coredination's Cardstock.  I love the texture and dimension I can get with the cardstock and a few embossing folders.   Yes, this entire project is done using cardstock and just a few buttons.

I chose quite a few of the Darice embossing folders that I have had in my stash, and lots of different fall colors of cardstock.  Stripes, honeycomb, chevrons; Darice has quite a variety of folders available for embossing.
I was really pleasantly surprised with how easy my little scarecrow was to put together.  I think it took longer to make all the cuts and feed through all the colors than it did to glue everything up.

I think he needs a name, but he has found a new home amongst my other Thanksgiving decor.

Hugs,

Wednesday, November 12, 2014

Rustic Fall Banner - Coredinations

Hi everyone!  Hope you are having a great week!  Things here are fabulous...ok, maybe not fabulous, but good.  The holidays are rapidly approaching and we are crazy busy with all that that entails.  Lots of school projects, holiday projects and of course crafting and creating,  Anyway,,,,today I wanted to share with you this Rustic Fall Banner I made for Core'dinations!  This is a simple project that takes just a bit of time to create, and can be expanded to fit just about any theme.  Fall-banner
Rustic Fall Banner Supplies:
fall_banner_coredinations_nancy keslin_supplies Step 1.  Cut Kraft cardstock to 4×6 and emboss with the wood grain embossing folder.  I used Tim Holtz Wood Grain Texture Fade.fall banner_cut_emboss_nancy keslin_coredinations_edited-1 Step 2.  Create pennant shape by marking the center of the rectangle one inch from the bottom, draw lines to to the corners, and cut.  This is how I create all the banners that I use and can easily be adapted to any size bunting.  This shape is quite popular in scrapbooking and I use it all the time.  A centering ruler really comes in handy here.fall_banner_pennant_nancy keslin_coredinations_edited-2 Step 3.  Cut letters for word or sentiment from black cardstock in your favorite font and center on pennants.  I used my Cricut to cut these, but any die cut machine, manual or electric would work.  Or you could use precut alphabets.fall_banner_letters_nancy keslin_coredinations_edited-1 Step 4.  Score top of pennant at 1/2 inch.  This will create a pocket for your cord.  You don't really need the pocket, but I find it gives the finished project a much more finished look.  You could poke holes in the pennant and string through that if you like.fall_banner_score_nancy keslin_coredinations_edited-1 Step 5.  Run cord through all the pennants and seal with glue, or for extra interest sew closed.  I chose to sew my pocket closed as it added a bit of interest. fall_banner_coredinations_nancy keslin_string
Step 6.  Tie cinnamon sticks in a small bundle and thread onto cording, one at each end.  They give the banner of lovely fragrance.fall_banner_coredinations_nancy keslin_cinnamon sticks
Step 7. Finish by clipping bird next to the cinnamon sticks.  This just gave the ends some weight so that I could swag the banner across my mantle, but the birds and cinnamon sticks are really just for embellishment.
fall_banner_coredinations_nancy keslin_birdThat's it....all done!  And so easy.  

Thanks for stopping by.

Hugs.

Nancy

Monday, November 10, 2014

Thankful Tree Centerpiece - Coredinations

Looking for something fun and meaningful, yet quick and easy, to decorate your home for the holidays?  Head over to the Coredinations blog to see my Thankful Tree Centerpiece.


Hugs

Friday, November 7, 2014

Friends Mean the World -Clear Scraps

Hi everyone!  Hope you are preparing for a great weekend!  Ours is pretty much the usual, swim meets.....
Friends_wordboard_clearscraps_nancy keslin
The minute my youngest saw this beautiful acrylic piece from Clear Scraps, Ainsley claimed it for her own.   I decided to really girl it up, with just a bit of grunge (she is a teen afterall).  And since her room is done in black and white, little pops of color are always great.
Friends_wordframe_nancy keslin_clearscraps_embellishment
After collaging the word frame with bits of tissue paper from Ranger, I used Faber Castell gelattos to add just a bit of color.  And then finished with a bit of ink.
Friends_wordframe_gelattos_nancy keslin_clearscraps
I used the 6"Spiral Dots Mascil from Clear Scraps with both some white crackle paint as well as some bead medium to add interest and texture.  This was one of those projects I just kept building layers on.  So much fun and the clear acrylic gives it so much depth.
Friends_wordboard_stencil_nancy keslin_clearscraps
Finally, I embellished the whole thig with some beautiful Kaisercraft Blu Belle stickers and loads of Prima flowers and resins and of course a little bit of sparkle with some Stickles.  hee hee
Friends_wordframe_nancy keslin_clearscraps_embellishment
I really hope she likes it in her room.

Wednesday, November 5, 2014

Pan Pastels - Online Class

Hey everyone!  Hope you are having a great day.  Things here are good....busy.....school and all.

Anyway, as part of Ainsley's school we do Art...and my friend Jamie Dougherty has some great online art classes available on her site.  I have taken, am taking, most of these...and Ainsley has participated in a few.   We decided to do the PanPastel class together....so much fun...and since we have quite the stash of PanPastels the perfect way to learn some new techniques.

 This first one...in blues...mine.
and this...is Ainsley's.

This class was so super fun.  If you are interested in learning about pan pastels, you should definitely check it out.

Hugs.