Showing posts with label holiday. Show all posts

Monday, November 7, 2016

Have Yourself a Lawn Fawn Christmas

Hello everyone!  Hope you are off to a great Monday.  Today I wanted to share with you a fun project I made for Chibitronics using some wonderful goodies from Lawn Fawn.  (we are hopping with them this week, be sure and check out their chibi projects as well).

Supplies Used:
Step 1:  
Cut plaid paper to 3.75x5 inches and using Dotted Square Stackable cut window.  I used the second largest square.  Save the inside window piece we will use it later.  Attach to card base.

Step 2:
Again, using the same square stackable, cut glitter cardstock for inside the window.
Step 3:
Stamp desired images onto white cardstock.  I like to stamp a few extras, just in case.

Step 4:
Die cut and color selected images.  I added stickles to the Christmas lights for added interest and sparkle.

Step 5:
Flip over the plaid inside window we cut earlier and free hand a snow bank and attach to glittered window we cut in step 2.  Assemble die cut and colored stamps where desired and using foam squares attach to snow bank background.

Step 6:  
Poke hole in card where you want light to shine through.  This is where we will place the star later. Place winter scene onto card base and use a pen or pencil to mark on card base where the light should be.
Step 7:  
Create circuit.  There are lots of great tutorials on the Chibitronics page for how to use different stickers.  You can find them here.  But this is what my circuit looks like when complete.  As usual, I have added a small strip of paper to keep my circuit from being complete until the paper is removed. This "switch" allows me to mail off the card without worry of the battery dying in transit.
Step 8:  
Place winter scene onto card base using foam tape. to allow for the battery and sticker depth.
This card was so much fun to make, and I love the way it twinkles.

Hugs.
Nancy

Wednesday, December 9, 2015

Glass Christmas Cutting Boards

Hi everyone!  Happy Wednesday...guess what?  I am back with more holiday goodies using my Cricut and svg files.  I know, CHA is coming and I should be working on projects...I still have so much to do, but making Christmas decor is so quick and easy.  hee hee
OK, so I found these small glass cutting boards/trivets at the Dollar Store and have seen so many fun things done I couldn't resist trying my hand.
Don't ask what I was thinking but I decided my first cutting board/trivet was going to be this beautiful Winter Wonderland scene.  Well, it took me two tries to get it properly weeded...one of these days I may have to read about how you are "supposed" to weed vinyl.  I am probably doing it all wrong.  lol I found the file in a Cricut user group on Facebook.
After that I had to try my hand at this super cute Santa found over at Kraftgineer. .  I wanted to give it as a gift, so I really needed it to be "right".  The Santa was much easier to center on the glass and the scrolls were much more forgiving than I would have originally thought.  I hope the recipient liked it. Anyway...if you are looking for scrolly (is that even a word) files, be sure and check this site out.  So many fun files.

Well, off to work on those CHA samples.  

Tuesday, December 8, 2015

Holiday Happenings

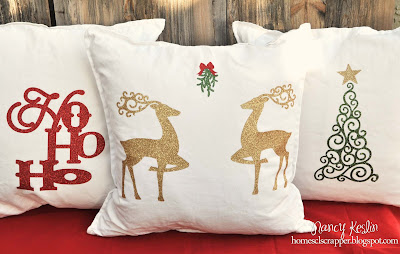
Hey everyone!  Back today to share with you some more Christmas Decor I have been working on.  Today I want to share some fun pillow covers.  These are great because I can just slide them over existing pillows, making storage of the pillows over the holidays easier, and not taking much space when I pack all the decorations away.
These were so quick and easy to make.  I had plenty of holiday files available in my Cricut Design Space to choose from, and had purchased some Cricut Glitter Heat Transfer Vinyl at Joann when they had a sale.  Lucky me.
My original plan was to sew some pillows, but I found some 20 inch pillow covers with zippers at Ikea for $4 each...there is no way I could have made these for that so...into my cart went a dozen or so.  hee hee
It was so quick and easy to cut the vinyl, and after a bit of hesitation I went ahead and committed, following the directions for use with my iron and....voila.  I probably spent more time being nervous than I spent actually making the pillow covers.  lol
I may make a couple more for Christmas and then the wheels are turning for other holidays....Valentine's Day anyone?

Thanks for dropping by.  Hugs.

Wednesday, December 2, 2015

Vintage Paper Christmas Tree

Yep, it's the holidays and that means I have been making tons of holiday decorations for the house, many with my Cricut, because...gosh, it is just so fun.

Today I want to share with you a paper Christmas Tree I made using a file from SVGCuts and papers from Prima.  This project was super easy to make once you get the folding figured out.   Luckily there is a video detailing how to assemble the tree.  And, it is a cute little box that you can light.

 I love these vintage papers from Prima Marketing....I just added a bit of ink and some gorgeous Stickles to make the tree come to life.
I found some fun, battery operated twinkle lights at Target that I can fit inside to light up the tree.  Thanks for stopping by.


Supplies Used:


Monday, November 30, 2015

Busy Busy Busy

Hey everyone!  sorry...I think I may just let the blog go come the new year.  I have slowly been stepping back from my DT commitments and really just need to take time to focus on family.  That doesn't mean I won't be creating...and posting the occasional tutorial.  Just that I will probably be sharing my projects more on facebook, instagram and twitter.  So be sure to follow/like me on those platforms.

Well, today I wanted to share with you a little something I made with my Cricut and some glitter vinyl from The Buckle Boutique.

I found these fun pump dispensers on sale at my local Michaels and thought they would be perfect for the holidays.  The glitter vinyl was quick and easy to cut using my Cricut Explore and some files I had on hand.  And weeding the glitter vinyl was a breeze.
 Just a couple of sparkly fun layers and my soap dispenser was complete.    Love a little sparkle and shine during the holidays, don't you?
Well, thanks for dropping by.  And don't foreget that if you want to keep seeing everything I make follow me on Twitter, Facebook, and Instagram.

Hugs.

Friday, November 20, 2015

Napkin Ring Upcycle

Hey Everyone!  Happy Friday!  Well, yesterday I shared how I am constantly coming across pinecones on my daily walk and thought I would share another project made with these fun little gems.

I've had these filagree napkin rings for quite some time and never use them because...well...I guess I am just over it.  lol  Anyway, with a few items from my stash including these fun medallions from the Buckle Boutique, I was quickly able to give them a new life.


I began by hot gluing a small piece of the lace ribbon around the napkin ring.
I then glued on one of the gold Buckle Boutique medallions.
And finally the pinecones (do not forget to clean your pinecones...no one wants creepy crawlies on their Thanksgiving table.
I love the way these look on my holiday table.  I wonder if I can just leave the table set till dinner?  lol

Have a great weekend.
Hugs.

Tuesday, November 17, 2015

Holiday Ornaments With Clear Scraps

Hi everyone!  I warned you last week, Christmas is coming so today I want to share with you a trio of simple holiday ornaments you can create this season.  
Ornaments_clear scraps_nancy keslin
These ornaments are so easy to make with Clear Scraps Clear Craft Sheets and your favorite stickers, or in my case, printable vinyl I cut with my Cricut Explore.
Ornaments_cut
I began by cutting the Clear Scraps Clear Craft Sheet into a circle using my Sizzix Die Cut machine.  Clear Scraps Craft Sheets are simple to cut with steel rule die cut machines, scissors...or purchase some of the fun shapes that are pre cut for you.  Clear Scraps has many shapes to chose from, including pre cut ornaments.  I then designed and cut my images on the Cricut to fit and applied to the acrylic.
Ornaments_sand
To add extra interest, you can sand the back of your ornament for a frosted look.
Ornaments_stickle
Or maybe paint on some stickles, or alcohol inks.  The clear acrylic allows for so many fun options.
Ornaments_clear scraps_assembled
How will you embellish yours?

Hugs

Wednesday, January 28, 2015

Love Notes - Core'dinations

Hi everyone!  Happy Wednesday.  Sorry I haven't been around much, it has been a crazy busy past few weeks.  With the holidays, which we spent two weeks in Hawaii, and then CHA, there just hasn't been much time for blogging.  Be sure and check out my other channels to see what's been going on....links are in the side bar ----------------------------------->


Anyway, wanted to stop by and let you know that I have a post up over on the Core'dinations blog today...one featuring this sweet little Valentine's mailbox...with a complete tutorial.  Come check it out.

Hugs.

Monday, December 15, 2014

Gift Bag Trio - Core'dinations

Hey everyone!  Hope you are had a great weekend.  Things here are crazy, between swim meets, the holidays, and getting ready for CHA.  Well, sorry if I haven't been around much.

But, I wanted to let you know that I have this trio of gift bags up on the Core'dinations blog today with complete tutorials.  So easy to make and they look totally adorable under the tree.


Hugs.

Wednesday, December 10, 2014

Holiday House Mini Album

Hey everyone!  I wanted to pop by today and share with you this little holiday house mini album I made using the fun House Mini Album from Clear Scraps.

Holiday_mini album_clear scraps_nancy keslin
I chose the House Album because I thought it would make a perfect winter theme.  With bits of "snow" made from ric rac and a holiday color palette, Pink Paislee papers,  this mini came together in no time.
Holiday_mini album_clear scraps_nancy keslin_1
Holiday_mini album_clear scraps_nancy keslin _2
Holiday_mini album_clear scraps_nancy keslin_3
Holiday_mini album_clear scraps
I am not nearly organized enough for a December Daily, but with this sweet little mini all that I need to do is add a few photos to document my month.  Thanks for stopping by.


Monday, December 8, 2014

Holiday Paper Lantern - Core'dinations

Hey everyone!  Things here are crazy!!!!  With prepping for CHA (not to self, get new business cards), dt work, CHA projects, and the holidays...eeek!

Just a quick drive by to share with you this paper lantern I made for Core'dinations!  I have had a project like this pinned forever and finally found the time to make one for myself.  Of course, I put a holiday spin on it, and with the use of the Core'dinations papers was able to add additional texture.

Be sure and check it out.