Monday, November 30, 2015

Busy Busy Busy

Hey everyone!  sorry...I think I may just let the blog go come the new year.  I have slowly been stepping back from my DT commitments and really just need to take time to focus on family.  That doesn't mean I won't be creating...and posting the occasional tutorial.  Just that I will probably be sharing my projects more on facebook, instagram and twitter.  So be sure to follow/like me on those platforms.

Well, today I wanted to share with you a little something I made with my Cricut and some glitter vinyl from The Buckle Boutique.

I found these fun pump dispensers on sale at my local Michaels and thought they would be perfect for the holidays.  The glitter vinyl was quick and easy to cut using my Cricut Explore and some files I had on hand.  And weeding the glitter vinyl was a breeze.
 Just a couple of sparkly fun layers and my soap dispenser was complete.    Love a little sparkle and shine during the holidays, don't you?
Well, thanks for dropping by.  And don't foreget that if you want to keep seeing everything I make follow me on Twitter, Facebook, and Instagram.

Hugs.

Friday, November 20, 2015

Napkin Ring Upcycle

Hey Everyone!  Happy Friday!  Well, yesterday I shared how I am constantly coming across pinecones on my daily walk and thought I would share another project made with these fun little gems.

I've had these filagree napkin rings for quite some time and never use them because...well...I guess I am just over it.  lol  Anyway, with a few items from my stash including these fun medallions from the Buckle Boutique, I was quickly able to give them a new life.


I began by hot gluing a small piece of the lace ribbon around the napkin ring.
I then glued on one of the gold Buckle Boutique medallions.
And finally the pinecones (do not forget to clean your pinecones...no one wants creepy crawlies on their Thanksgiving table.
I love the way these look on my holiday table.  I wonder if I can just leave the table set till dinner?  lol

Have a great weekend.
Hugs.

Thursday, November 19, 2015

Pinecone Owls- Kids Craft

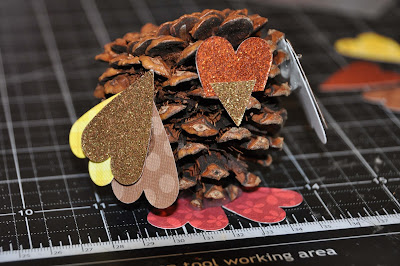
Hey everyone!  Hope you are having a great day.  Recently I had my niece over for a few days while my sister was out of town...well, you know what that means; kid crafts!  lol   Every day I walk the dog and every day I see gobs of pinecones lying on the ground along the paseo (public walking area in my neighborhood).  Anyway, we grabbed a few and decided to make these with the help of my Sizzix Machine.

Now, before you start, if you are using pinecones you have found, you may want to clean and de-sap them.  No one wants creepy crawlies coming out of their owls.  hee hee  To do so, fill a bucket with warm water and 1/2 cup vinegar and let set for 30 minutes and then place on newspaper to dry overnight.  The cones will be fully open when dry.
Lili loves using the Sizzix Big Shot, and it cuts so many different materials.  We cut pieces of cardstock, glitter cardstock, fun foam and felt to create our owls using the Primative Hearts #3.
These are a few of the Core'dinations papers we cut.  Sticking with one shape made mixing and matching the pieces of our owls quite easy.
If you want your owl to have a fat top, find the balance point of the pinecone tip.  Or, simply have a skinny owl by using the base for the feet.
We cut hearts in half to create additional shapes for the owls, The top part of the heart is perfect for the face, bottom part of the owl the beak.  Cut the beak in half and you have ears.  How easy is that?  Whole hearts make cute wings that you can use one at a time, or layer for a fun look.  You can also use the full hearts for feet.
Simply use craft glue, or to ensure a firm, quick dry (and a bit safer for little hands) or hot glue to place the pieces on your pinecone.
Mix and match your colors and patterns for even more fun.
Finally, a few google eyes to make the owl adorable.  How easy was that?

So grab a few scraps of paper and fabric and your Sizzix machine and start cutting pieces for owls.  This would be a fun craft to do on Thanksgiving with the whole family.

Hugs.

Tuesday, November 17, 2015

Holiday Ornaments With Clear Scraps

Hi everyone!  I warned you last week, Christmas is coming so today I want to share with you a trio of simple holiday ornaments you can create this season.  
Ornaments_clear scraps_nancy keslin
These ornaments are so easy to make with Clear Scraps Clear Craft Sheets and your favorite stickers, or in my case, printable vinyl I cut with my Cricut Explore.
Ornaments_cut
I began by cutting the Clear Scraps Clear Craft Sheet into a circle using my Sizzix Die Cut machine.  Clear Scraps Craft Sheets are simple to cut with steel rule die cut machines, scissors...or purchase some of the fun shapes that are pre cut for you.  Clear Scraps has many shapes to chose from, including pre cut ornaments.  I then designed and cut my images on the Cricut to fit and applied to the acrylic.
Ornaments_sand
To add extra interest, you can sand the back of your ornament for a frosted look.
Ornaments_stickle
Or maybe paint on some stickles, or alcohol inks.  The clear acrylic allows for so many fun options.
Ornaments_clear scraps_assembled
How will you embellish yours?

Hugs

Friday, November 13, 2015

41 Days till Christmas

Hey everyone!  Happy Friday!!!!  Can you believe it is only 41 days till Christmas?  Well, I have been madly working on holiday gifts and decor around here and today I want to share with you a mini album I made for Clear Scraps.

I used the fun Christmas Mixable album and some older papers from Making Memories that have been in my stash forever.  Of course I also used some of my favorite Core'dinations Tim Holtz Metallic Kraft Core (love, love, love this stuff) for some extra shine and sparkle.
The reindeer I cut with my Cricut, and the snowflakes are a Simon Says Stamps die that I cut with my Sizzix Big Shot.  Love both those machines.
Lots of inking, and layering; along with a bit of distressing on all the fun pages.  And of course touches of Stickles and more metallic paper to brighten things up.
This "mini album" is a bit bigger than most, it is a full 12 inches high, so I was able to sneak lots of spaces in for photos and journaling.
Thanks for stopping by today.

Hugs.

Thursday, November 12, 2015

Pinewood Derby Season is Coming

Hey everyone!  Happy Thursday.  Today I want to share with you a fun project I made.  Lots of talk these days with friends about scouts, seeing all their cub scout photos, remembering our scouting days.  Anyway that got me to thinking....I love playing with electricity and circuits (thus the reason I am working with Chibitronics)...what if I lit up a pinewood derby car?

Well, after years of Cub Scouts and Y-Guides, I had quite a few cars to choose from.  I chose to go with the fire engine that Brighton made oh so many years ago (maybe 10?).  Anyway, what would be more fun than adding flashing lights, just like a real fire engine.

So, here is the fire engine that Brighton made all those years ago.

I began by placing my Chibitronics Copper tape in parallel across the top and wrapped it under the body of the fire engine.
I added three lights, two red and one white.  Chibitronics chibi lights come in a variety of colors, and if you want you can even color them with Sharpie for a custom color.

Well, a car that lights up is pretty cool, right...but this is a fire engine, those lights need to blink.  lol  So I added in the twinkle effects sticker.  There are a total of four effects in the pack, I did the blinking before on a gift bag, so I decided to try the twinkle.  Now, this car has seen its days racing down the track.  If you wanted to do this for a real race, you would want to hollow out the area where the battery sits so that it doesn't come into contact with the track.


Tuesday, November 10, 2015

Fall Leafy Wreath

Hi everyone! Today I want to share with you a fun fall project using a Clear Scraps Clear Craft Sheet and a mirror piece from a from the Oval Fancy Mirror Frame and one of my favorite fall Sizzix Dies, the Tim Holtz Layered Leaf.
Leaf wreath_sizzix_clear scraps_nancy keslin
Supplies Needed:
Leaf wreath_supplies
Step 1:  Cut Clear Craft Sheet in thirds and die cut leaves.  I found by doing so I was able to create 9 leaves with just one sheet of Clear Acrylic.  The Clear Craft Sheet is simple to cut with a pair of scissors and it cuts even easier with the Sizzix die cut machine and steel rule dies.
Leaf wreath_sizzix_cut
Step 3:  After cutting, simply emboss with the coordinating Texture Fade.  The Texture Fade comes with the die, so a one stop shop.  Did you know that you can emboss your acrylic?  How cool is that?
Leaf wreath_sizzix_emboss
Step 4:  Remove plastic covering from Clear Craft Sheet.  These leaves still have the sheets, but how cool do they look?
Leaf wreath_leaves
Step 5:  Ink leaves with Stazon and then spray backside with IrResistable spray in bronze.  The bronze irResistable spray really helps the leaves stand out while still highlighting the translucense of the acrylic.
Leaf wreath_leaves_inked
Step 6:  Ink mirror piece in the same colors as leaves and attach words (I chose vinyl which I cut with my Cricut, but you could use a sticker, or leave this piece off all together)
Leaf wreath_mirror
Step 7:  Glue all pieces to embroidery hoop.  How simple is that?  I used a bit of Beacon Zip Dry.
I would love to see what projects you create with Clear Scraps.  
Hugs.
Nancy

Monday, November 2, 2015

A Camera Box with a Flash?

Hey everyone!  I know, long time no see.  I just haven't been feeling it lately, and with the stress of my paren't injuries, preparing college and grad school aps, and Ainsley's beginning high school things have been a bit busy.

I did want to pop in today and share this fun camera box I made with a file from SVGCuts.  It is part of the Instant Memories Collection. 

You know how much I love SVGCuts, they make creating fun 3D projects so quick and easy, and they work wonderfully with my Cricut.

See that big button?  The one with the flower in the center?  That is the switch for the flash.

Because what is a camera that doesn't actually flash when you take the photo?  lol  To creat the lights I began by making a circuit with the Chibitronics Starter Kit.  I ran my copper tape from the clear box where the flash would be on a real camera, placing my LED light right next to the hole.
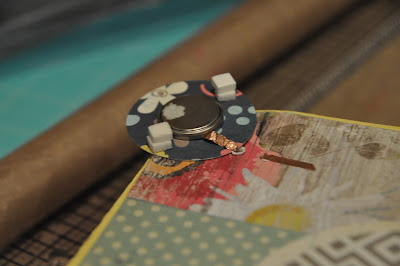
The Chibitronics circuit continues up through a few little holes I made in the top of the box and onto the button where I place my battery.  I added a few pieces of foam tape next to the battery so that the battery could not make contact unless the button was depressed. 
The foam tape adds just enough cushion to allowe for a firm press.  I also lined the box with some of the Core'dinations Tim Holtz Kraft Core Metallic collection so that you could reallly see the flash. Such a fun project, and will easily hold a mini album.

Hugs.