Showing posts with label spring. Show all posts

Monday, May 18, 2015

Spring into Banners

Hi everyone!  Hope your Monday is off to a great start...mine is obviously a little slow.  lol  Today I wanted to share with you a banner I made for Clear Scraps using  the Small Pennant Banner and some beautiful Echo Park Victoria Gardens papers that have been in my stash.

 I love the mix of papers here with some odds and ends on my desk....And look at those beautiful dragonfly mirror embellishments that are now available from Clear Scraps as well.  Swoon....
For now this banner is hanging, but I think I may add a few photos on the backsides of the banner...after all, because of the clear acrylic I already have paper covering it, and turn it into a fun little mini

Hugs.

Monday, March 30, 2015

How to Make Your Spring Sparkle

Hi everyone!  Hope your Monday is starting out great and that you had a wonderful weekend.  Me...well, spring has definitely sprung, so we spent a good portion of the weekend working in the yard.  I love all the beautiful flowers at the garden supply these days and couldn't resist bringing some home.  Of course, I had to make the pots I was planting in extra special....


This is a super quick and easy project with the help of the Rhinestone Sticker Sheets from The Buckle Boutique.

To begin, I simply measured the depth of the rim on my clay pot....simple, right?
 
Then cut the Rhinestone sticker in strips to size.  I chose to use a craft knife and ruler, but you could easily cut these rhinestone sticker sheets with scissors.  

The last thing you need to do is stick the strips around the rim of your planter.  So simple, right?  It took a bit of burnishing to get the gaps out of my planter, but overall this was so simple
 This project is super easy and fun and would make a great alternative to cut flowers.
Hugs.

Wednesday, February 25, 2015

A Little Birdhouse - Sizzix

Hi everyone!  Hope you are having a great day.  Today I wanted to share with you a little house I made with a few Sizzix dies that I was sent from Sizzix after CHA.  
I made this house out the ScoreBoards XL Canister die and the Scoreboards XL Cupcake Stand.  I began by die cutting the necessary pieces from the Little Sizzles 6x13" white MatBoard.  The MatBoard gives the final project a great weight and is sturdy enough to stand up to quite a bit of abuse. You need two of the box sides and two of the stands to complete the project.  I did not use the canister top nor the banners.
After cutting the matboard I die cut the same pieces from my patterened paper.  I needed to make four of the cupcake stand pieces to cover all the sides, front and back.  I placed once cutting pad under my die, then my die, my paper and finally the additional cutting pad.  This allowed me to ensure that I was cutting exactly the pieces I needed in the colors I wanted.
I adhered the papers to the MatBoard with a strong adhesive.
To assemble my canister I began by creating the folds needed and applied a strong adhesive on the edges.
To add the stand to the canister I placed more adhesive along the top of the stand...
And simply added the canister on top.
To embellish my little house I used diecuts from the Kitchen Labels set that I embellished with a bit of glitter.
Finally I added a few flowers from my stash as well as a drawer knob that I had left from another project.
I am very pleased with this sweet little house and look forward to adding it to my collection.

Hugs.

Nancy

Items Used:
Sizzix Big Shot Machine Powder Blue and Teal
Sizzix Scoreboards XL Die Canister
Sizzix Scoreboards XL Die Cupcake Stand & Pennant
Sizzix Framelits Die Set 7 PK Labels, Kitchen
Sizzix Little Sizzles Mat Board Pack
Sizzix Cutting Pads, Extended
Standard Magnetic Platform for Wafer- Thin Dies
Patterened Papers - Crate Paper Random
Flowers -

Wednesday, June 11, 2014

Topiary Tutorial - Darice and Core'dinations

Hello everyone!  Ah, summertime!  I so adore being out of school...long lazy days and beautiful weather.  I think a trip to the beach is in order.  But before I go, how about I share with you this topiary I made for Darice with Core'dinations paper and a few basic craft supplies.
Spring-DIY-topiary-Darice

Spring DIY topiary supplies:

Step 1: The first step is the most fun – creating the flowers.  I chose three beautiful colors of Core’dinations cardstock for my paper flowers. Then, I used my Cricut electronic cutting machine and the Flower Shoppe cartridge to create a ton of flower die cuts.  I cut each of the spiral flowers to 2.5 inches.  I was able to get 16 flowers per sheet of cardstock. Cut Cricut Flowers
Step 2: Assemble the flower die cuts.  Each assembled flower should measure approximately 1 1/4 inches across.  You don’t want to roll them too tightly.
rolled flowers_darice_nancy keslin_topiary
Step 3: I sanded each flower to expose the lighter core of the paper as well as open up the flower.  You can see the difference below.
sand photos_darice_nancy keslin_topiary
Step 4: When you complete the sanding process, begin gluing the flowers to the Styrofoam ball in a random pattern.
glue flowers_darice_nancy keslin_topiary
Step 5: If you would like to make a double DIY topiary like mine, cut the dowel rod into multiple pieces. The lower rod should be 12 inches and the top rod 3 inches.  Stick one dowel rod into each of the flower balls and then the shorter lollipop into the longer. Place the Styrofoam disk into the flower pot and then the lollipop flower through that.
Spring-DIY-topiary-Darice-nancy-keslin-1
Step 6: Add some moss to the top of the pot to hide the disk.
topiary_darice_nancy-keslin
Step 7: Add a pretty satin bow to the base of the DIY topiary flower ball.
topiary_close up_darice_nancy keslin
 I hope you give this spring DIY topiary a try.

Wednesday, April 16, 2014

Spring Banner - Darice

Hi everyone!  Today I want to share with you a spring pennant banner I posted on the Darice blog last month. This paper pennant banner is a great way to decorate and welcome spring into your home!  

Spring-Pennant-Banner-Darice-1

SPRING PENNANT BANNER MATERIALS CHECKLIST:

1.  Decide what you want your pennant banner to say. I chose the word “Welcome” with one embellished pennant on each side, making a total of 9 pennants. For each pennant, cut two 1 inch circles and one triangle (slightly larger than your canvas banner piece) out of the Core’ Essentials Cloudburst. I made 18 paper circles and 9 paper triangles.  Emboss all the pieces using the stripes embossing folder.
Banner_darice_step1
2.  Place a canvas pennant on top of a cardstock triangle and adhere together.

banner_darice_step2
3.  Using the doily lace punch, cut a 1/2 x 12 inch strip from the Core’dinations Iced Cocoa.

banner_darice_step3
4.  Cut the paper lace strip in half. Adhere behind the triangle with a piece of red plaid paper tape.

banner_darice_step4
5.  Before you get to embellishing, punch 2 holes on each side of the pennant.
6.  To make the rosette, cut a 1 x 12 inch piece of Iced Cocoa cardstock and fan fold at every 1/4 inch.

banner_darice_rosette_step1
7.  Adhere the ends together to form a ring.  Place a glue dot or dab of hot glue on the circles you made earlier and sandwich the ring between.  Hold until set.
banner_darice_rosette_step2
8.  Adhere the rosette to the already assembled pennant.

banner_darice_step5
9.  Apply the sticker letters to each of the rosettes to spell your sentiment. Embellish with the chipboard stickers and flowers as desired.

banner_darice_step6
10.  When each pennant is complete, use the cotton cord to attach, spelling out your sentiment.
Spring-Pennant-Banner-Darice-1
Would you like to create your own banner?  I have all the makings for another to share.  
a Rafflecopter giveaway
Thank for stopping by. Hugs.

Tuesday, April 1, 2014

Darice Blog Sneak Peek

Hey everyone!  Just a quick drive by to let you know I have a post today up on the Darice blog, Live, Craft, Love.  If you get a minute, sneak over and check it out!  There is a tutorial for creating this.....


Hugs


Thursday, March 28, 2013

Pack Your Bags and Scoot to Hydrangea Hippo


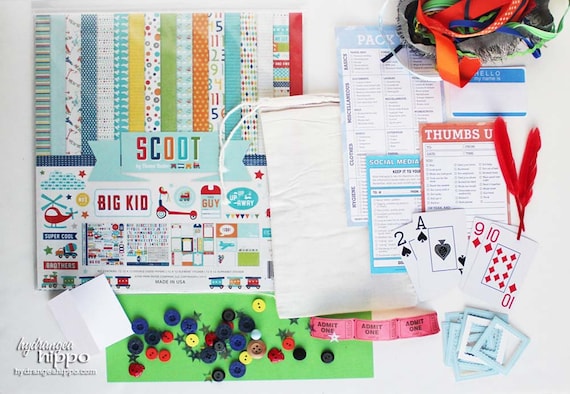
Hi everyone! Today I wanted  to share with you a few projects I made with the Hydrangea Hippo Pack Your Bags and Scoot crafting kit that was featured over on the Hydrangea Hippo blog a few weeks ago.

When I saw this kit I loved the fun colors and embellishments and couldn't wait to start creating.  In the end, I was amazed at the variety of projects I was able to create.

Although this paper line from Echo Park seems geared toward younger children, I found that the colors and patterns when mixed with the kit embellishments were perfect for my older teen and started out with a 12x12 layout.
The sticker sheets and papers in this kit contained many train and travel related elements, so I decided to use my Cricut to cut a mini album in a train shape to feature a few of the photos from our cross country train trip.  Yes, this was just a few years ago.....look at those baby faces.  hee hee
 
And finally, for something completely different I decided to create a rose topiary as a bit of home decor.  I used my Tim Holtz pinecone die with my Sizzix and lots of the papers in the kit to make the roses.  I punched my butterflies out of the playing cards and then layered on the trims.  Hydrangea Hippo always has the most gorgeous trims.....


I still can't believe the variety of projects I was able to make with this kit.  From beautiful, spring, home decor, a project for an older teen, to a mini album filled with photos of my children when they were younger, this kit offers something for everyone.

Be sure and grab your kit today and get started creating.

Hugs.

Nancy

Wednesday, February 6, 2013

Hey You - Flip Card

Hi everyone!  Well, it's Wednesday and this week seems to be just flying by.  Before we know it it will once again be the weekend.  woo hoo!  Well, maybe not so much woo....swim meet.  lol

Today I want to share with you a green friendship card I made using one of the Sizzix dies I purchased from Kristina at Your Memories Here.
sizzix, card, die cut, prima
I colored my stamped image using Tim Holtz Distress Markers.  I love that these distress markers make it so easy to create a water color look on my project.
flowers, seam binding, distress markers
And of course I couldn't resist using a few gorgeous Prima Blooms to brighten the card and a bit of seam binding dyed with some green Glimmer Mist.  This card is just perfect for spring.
prima, stickers, sentiment
A simple sentiment with a Prima sticker completed the look.  I love the way this project came together with the mixture of Prima, Distress Markers, and Sizzix.  I think this die has to be one of my favorite dies ever.

I hope you enjoy this card.  I know I had fun making it.

Hugs.

Nancy

Products Used: