Showing posts with label diy. Show all posts

Tuesday, December 8, 2015

Holiday Happenings

Hey everyone!  Back today to share with you some more Christmas Decor I have been working on.  Today I want to share some fun pillow covers.  These are great because I can just slide them over existing pillows, making storage of the pillows over the holidays easier, and not taking much space when I pack all the decorations away.
These were so quick and easy to make.  I had plenty of holiday files available in my Cricut Design Space to choose from, and had purchased some Cricut Glitter Heat Transfer Vinyl at Joann when they had a sale.  Lucky me.
My original plan was to sew some pillows, but I found some 20 inch pillow covers with zippers at Ikea for $4 each...there is no way I could have made these for that so...into my cart went a dozen or so.  hee hee
It was so quick and easy to cut the vinyl, and after a bit of hesitation I went ahead and committed, following the directions for use with my iron and....voila.  I probably spent more time being nervous than I spent actually making the pillow covers.  lol
I may make a couple more for Christmas and then the wheels are turning for other holidays....Valentine's Day anyone?

Thanks for dropping by.  Hugs.

Monday, March 9, 2015

Get Better Soon - Core'dinations Gift Box

Do you have a friend, family member, or co-worker suffering from cold and flu season? Check out this project I made for Coredinations....a Get Well Soon box made from a few basic Core'dinations supplies and filled with goodies to have them feeling better in no time.
get well box
Get Well Box Supplies:
first aid_coredinations_nancy keslin_supplies

Step 1: Trace box template onto white Core'dinations cardstock.  The 110lb cardstock has a nice weight and will create a sturdy box.  If you want something a little more heavy duty, you can add a layer of thin chipboard or shirt board.  Score along inside lines.  I added a bit of washi tape to hold my template while I cut.  
first aid_coredinations_nancy keslin_cut and embossStep 2:  Cut strips of Roasted Pepper, Jillian Dot paper 1/2 x 1 1/2 wide.  You will need 4 strips to create the cross shapes for the front and back of the box.  Love the cute texture of this paper.
first aid_coredinations_nancy keslin_red cutsStep 3:  Assemble box and attach Medical Cross to the front and back.
first aid_coredinations_nancy keslin_assembleStep 4:  Fill your box with your recipeint's favorite things.  Some suggestions include magazines, puzzle books, cough drops, tissues, hand sanitizer, tea bags, lip balm...really, the sky is the limit.  Don't forget a cute, bright colored tag with well wishes written on it.
first-aid_coredinations_nancy-keslin_fillled

Around here we haven't suffered too terribly this season.  I hope you have been just as lucky.

Hugs.

Friday, February 20, 2015

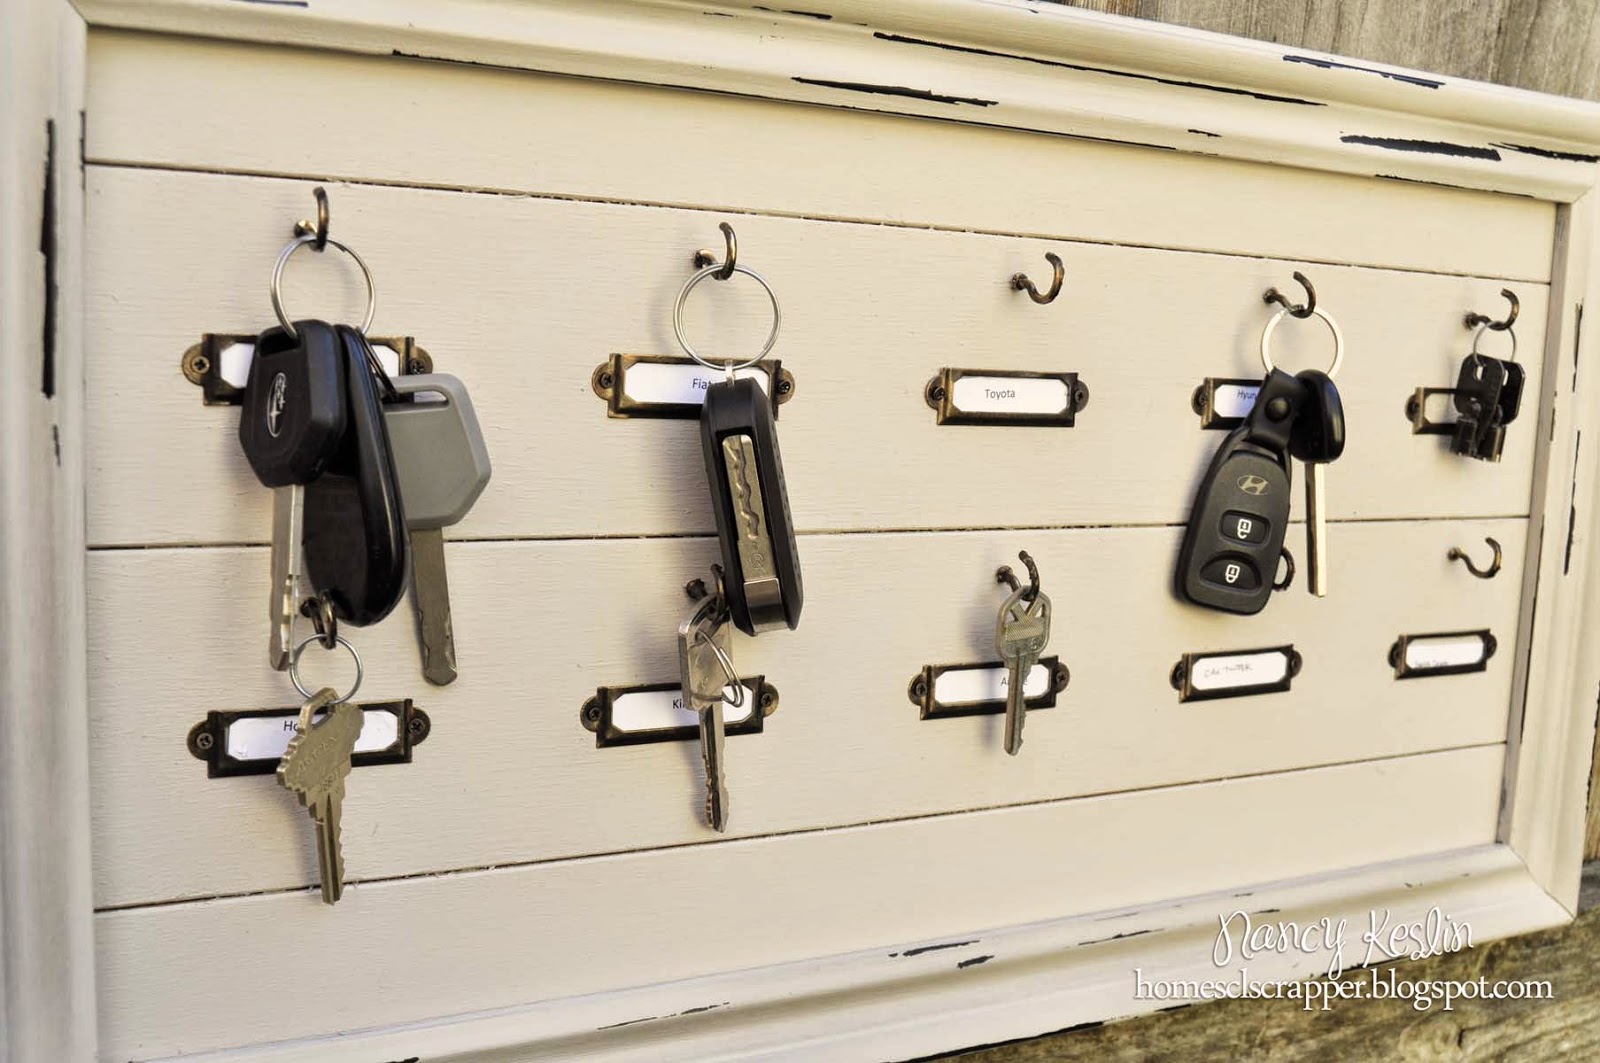
Pinterest Plan Key Rack

Hi eveyrone!  Happy Friday!   I hope you have something fun planned for the weekend.  Me?  Not much.

Well, back in January I told you that I was planning on tackling my Pinterest boards...trying to actually create some of the things I have pinned.  Well, I don't know about you, but in my house we are forever losing keys...or finding keys and not knowing what they go to?  Anyway, please tell me I am not alone.

Well, I have had this "Hotel Key Rack" on my pinterest boards for a while and thought I would tackle it.

Well, looking at this now, mine isn't quite as cute...I probably should have gone back and looked where they placed the hooks...oh well....wonder how hard it would be to move them?  hee hee

Was this project successful?  Yeah, I guess so...I may try and move things around a bit to get them to fit a little better...planning better for the key placement and all.  The Key Rack was pretty easy to make.  I was able to find most of the supplies around the house.  

Thanks for stopping by.  And come see me on Pinterest...you can see the link over there ------->

Hugs.

Monday, October 20, 2014

Circles of Fun

Hey everyone!  Just a quick post to let you know I had a project go up on the Core'dinations blog over the weekend.  We always have so much fun with photo booths around here, I couldn't resist making a cute background.  So easy to recreate, you should definitely check it out.


Friday, September 19, 2014

Pinwheel Party with Embellish by Dena - Darice

Hi everyone! Today I wanted to share with you a project I did for Darice using more of the gorgoues Little Azalea patterned papers from Embellish by Dena. These papers are so bright and cheerful, I couldn't resist making a few pinwheels for my friend's daughters to play with.

paper-pinwheel-daricePAPER PINWHEEL SUPPLIES:

Step 1. Begin by selecting coordinating patterns from the Embellish by Dena Little Azalea paper pad.  I chose to mix and match a bold pattern with a subtle one and I loved how this turned out. If you are using the 12×12 pad, cut each sheet into 6×6 pieces and glue the back sides together. You want the pattern to be visible on both sides of your pinwheel. pinwheel_darice_dena designs_nancy keslin_papersStep 2. Using a ruler, draw lines on the diagonals and cut to within a half inch of the center. pinwheel_darice_dena designs_nancy keslin_linesStep 3. Place hot glue into the center of the papers and gently bring corners together into the center, working in a circular fashion. This will create the pinwheel.  The side you apply the glue to will be the inside of the pinwheel. pinwheel_darice_dena designs_nancykeslin_glueStep 4. Place the brad through the center of the pinwheel, pushing through the glue. pinwheel_darice_dena designs_nancy keslin_bradStep 5. Poke a small hole into the paper straw and insert brad from pinwheel. pinwheel_darice_dena designs_nancy keslin_strawNote* These pinwheels can be made bigger or smaller based on the size of the paper and the length of the straw.  For a giant pinwheel, try a full 12×12 sheet of paper, a dowel and a push pin.  For a straw you can drink from, try hot gluing the pinwheel to the straw. You’re Finished! Now you can make as many pinwheels as your heart desires and watch them spin! paper-pinwheel-darice

Wednesday, September 17, 2014

Embellish By Dena Cupcake Toppers

Hi everyone!  Today I want to share with you a project I made for Darice using the gorgeous new Embellish By Dena Little Azalea Papers.

Now, if you know me, you know I love me some cupcakes...and with just a few simple supplies I can make my cupcakes extra special. 

DIY-cupcake-toppers-DariceDIY CUPCAKE TOPPERS SUPPLIES:

Step 1. Begin by punching your patterned paper with the large scallop circle punch. Punch as many circles as cupcake toppers needed.
punch circle_darice_cupcake topper_nancy keslinStep 2. Next, punch the same number of non-scalloped circles from your plain cardstock. Adhere your non-scalloped circles to your scallop cutouts with a tape runner.
cupcake_toppers_darice_nancy keslin_circleStep 3. Embellish your DIY cupcake toppers. Add as many or as little embellishment as you want. I like the heart die cuts from the David Tutera Celebrate line because they are versatile enough to use for many occasions. They’re great for birthdays, wedding showers, baby showers and more.
cupcake_toppers_darice_nancy keslin_embellishStep 4. Using glue dots, attach a toothpick to the bottom of each circle set. cupcake_toppers_darice_nancy keslin_toothpickNow you can simply insert your DIY cupcake toppers into your cupcakes to make your treats extra special! cupcake_toppers_darice_dena-designs_nancy-keslin-800x531Easy as
pie….cupcakes.


Wednesday, August 13, 2014

Bloom Girl Box and Cards

Hi everyone!  I hope you are having a great day.  Things here are moving along nicely...keeping up with everything and everyone.  today I want to share with you a fun little cardbox and cards I made using Jamie Dougherty's Bloom Girl colleciton by Prima.

The box holds both the cards (4) an envelopes.  Each of the cards was colored, misted, inked and embellished....so much fun playing with my toys.
Thanks for stopping by,

Hugs

Wednesday, July 16, 2014

Embellish By Dena Designs

Oh my goodness....can I just tell you I have fallen in love with a new paper line.  No, it isn't Prima, or Crate Paper, or probably anything you have heard of...it is Embellish by Dena Designs.  This paper is manufactured by Darice and I just love it.  I love the mix of patterns, colors...oh goodness I could go on and on.  But how about if I show you some of the things I have posted over on the Darice blog instead.

These cupcake toppers have a quick tutorial.  I love how quick and easy they were to make, plus they add so much personality to an otherwise typical plate.
Cupcakes not your thing?  These adorable pinwheels were made with the same paper pack.

special should out to my fried Judy for letting her girls come by and play with the pinwheels. 

Right now the papers are available at Consumer Crafts and Amazon.com.  Be sure and check them out.
Hugs.

Monday, July 7, 2014

DIY Wedding Seed Packet Favors

Good Morning!  Today I want to share with you another DIY wedding project I made for Darice.  I love the handmade burlap flowers and if you're on the lookout for simple and inexpensive DIY wedding favors, these embellished seed packets are a perfect choice!  Just be sure the seed packets you pick have a meaning you want to convey.  I used The Language of Flowers website to choose mine.

diy-wedding-favors-seed-packetsSeed packet DIY wedding favors supplies:

To see the complete tutorial be sure and check out the Darice blog.  
diy-wedding-favors
Hugs

Monday, June 30, 2014

Posy Holder DIY Wedding

Good morning!  I hope your day is off to a great start.  Today I wanted to share with you this tutorial I made for Darice featuring gorgeous Core'dinations papers, Martha Stewart trims, and the most adorable little chalk boards. 
Wedding-aisle-decor-Darice
Posy wedding aisle decoration supplies:

Step 1: To form the cone, I used a large plate to trace a 1/2 circle out of the Whitewash Coredination's  paper (my plate was about 11 inches).  I love the soft, shabby look this paper has once sanded.  I cut a small piece out of the circle to make it less bulky when rolled.
Wedding-aisle-decor-Darice-1
Step 2:  After sanding, I placed a piece of double sided tape on the back side of the semi circle across one of the edges.  This will hold the cone together and create a clean seam.

Wedding-aisle-decor-Darice-2
Step 3:  Roll the cone tightly, being sure to keep a nice point at the bottom.  Once rolled you can do any additional sanding necessary, but it really is much easier to sand the flat surface..
Wedding-aisle-decor-Darice-3
Step 4:  Embellish the top of the cone with a bit of the lace duct tape and some flower ribbon.

Wedding-aisle-decor-Darice-4
Step 5:  For the bottom of the cone, I made a smaller cone using the same technique with a doily.  I poked a couple of holes into the bottom of the cone and then threaded a jump ring through it.  I used a headpin through the pearl bead to create a dangle.
Wedding-aisle-decor-Darice-5
Step 6:  For the finaly embellishment, I used Zip Dry to attach a small piece of the leaf ribbon, some pearls, and a large flower to the chalkboard tag and clipped to the cone.
Wedding-aisle-decor-Darice-1
To hang the cone, you can use either more of the small string pearls or the ribbons.  For this one, I chose the pearl string.  All that is left is to fill your posy decoration.

Wedding-aisle-decor-Darice-2
Such a fun and special item for that perfect day!